More Plugins!
| Site: | Virtual Academy for Teaching and Learning |
| Course: | Multimedia VATL help |
| Book: | More Plugins! |
| Printed by: | Guest user |
| Date: | Saturday, 20 June 2026, 1:55 PM |
Description
These plugins are new to us. We are using them in version 3.5.
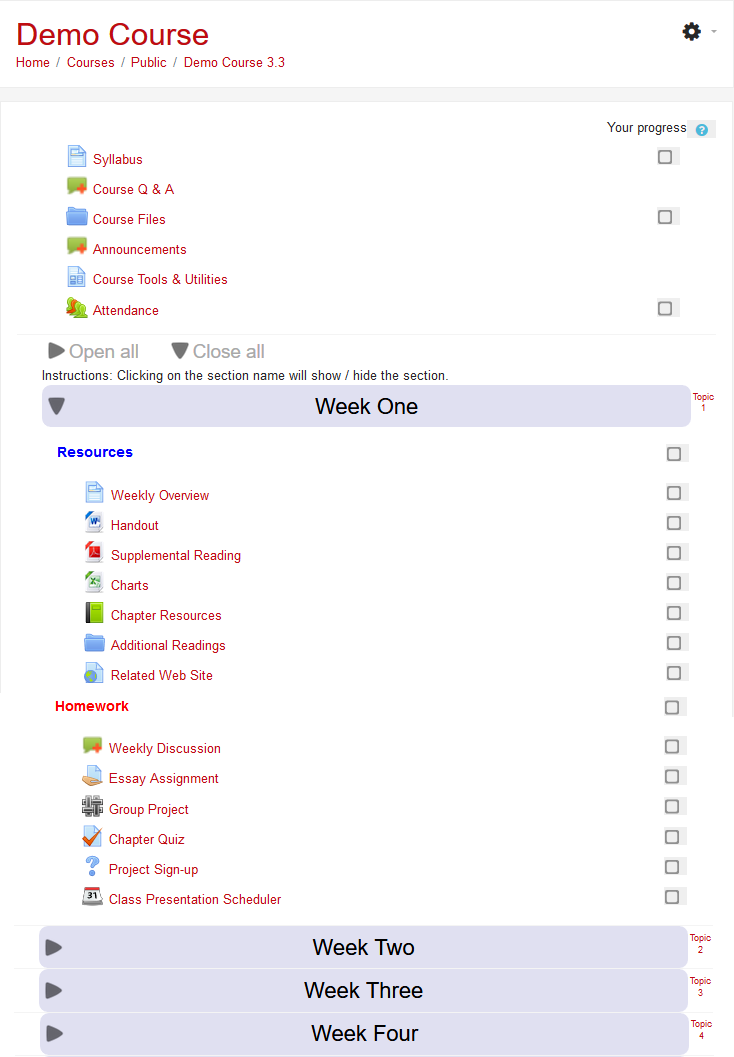
Collapsed Topics Format
In addition to the weekly and topics format, our new installation features "Collapsed topics" as a course format. This format is great for eliminating Moodle's famous "death scroll."
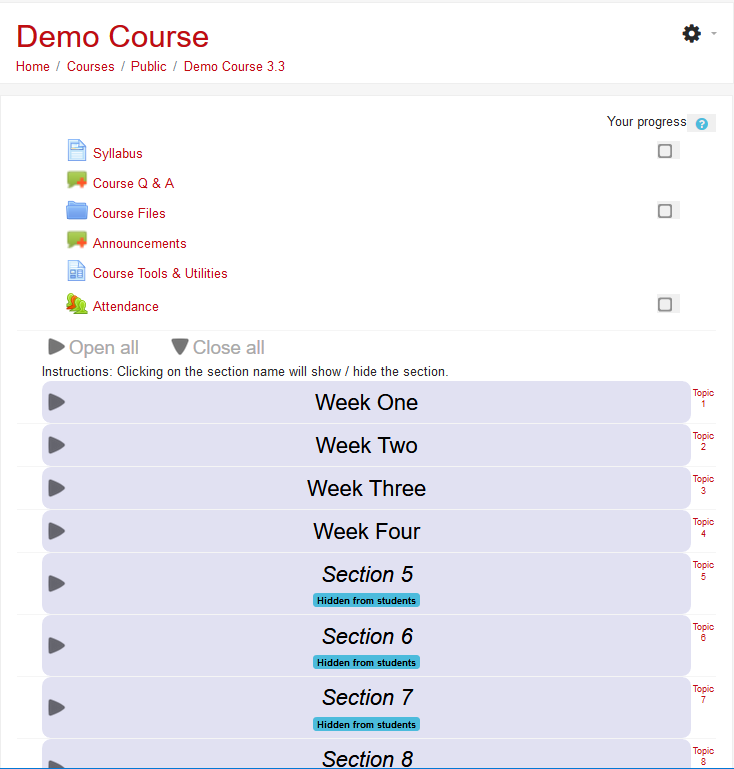
Collapsed Topics: Opened Section
Clicking on the section name opens the area up and displays the section's content.
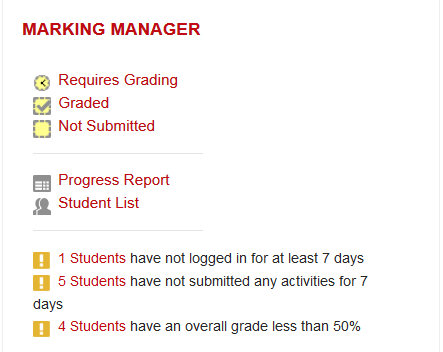
Marking Manager
The Marking Manager block facilitates assignment grading.
Faculty can see this block, but it remains hidden from students.
One of the advantages of the Marking Manager block is that it not only provides a recap of assignment status for the entire course, but it also displays a snapshot of student engagement. Clicking on the links provided shows you which students have not been active and reports when they last logged in. By default, the block informs you that students are failing if their gradebook score is less than 50%, but you can adjust that number as you wish by configuring the block.
Grading with Marking Manager
Here's how the Marking Manager block looks when you select a file submission assignment for grading:

Group Members Display
It's always been challenging for students to find out who's in their group. Our new "Group Members" resource creates a page that lists either just the members of a student's group or all of the students in all of the groups.
In addition to choosing whether to show all or some of the groups, you can also choose to reveal email addresses just for other group members or for all students.
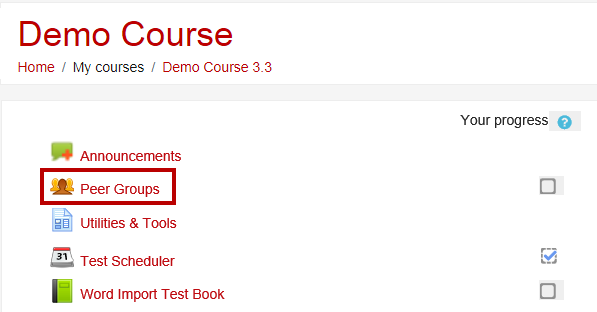
Here's what the link looks like on your course page—note that you can name the link however you like (Teams, Groups, etc.).
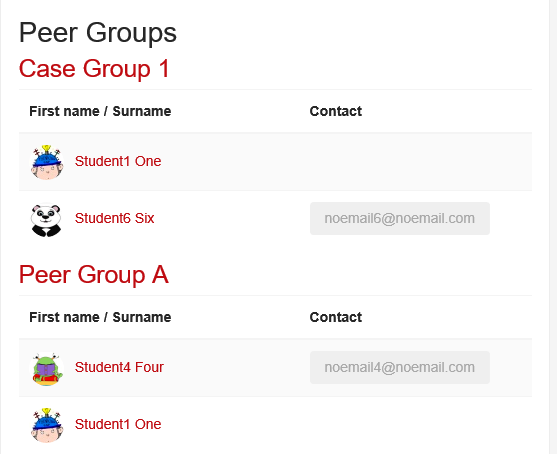
Group Members: Own Group
Here's what Student One sees when the Group Members resource is set to show "Own group" and email addresses are displayed:
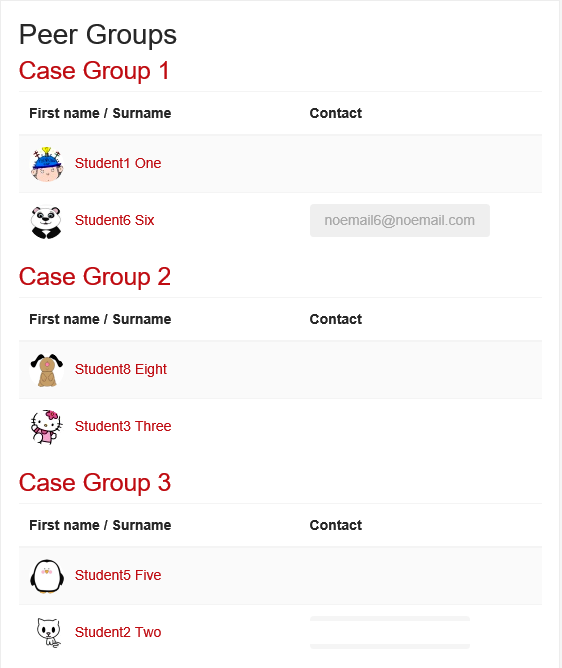
Group Members: All Groups
And here's a partial view of what Student One sees when all of the groups are displayed and just his group's email addresses are shared:
Group Members: Teacher View
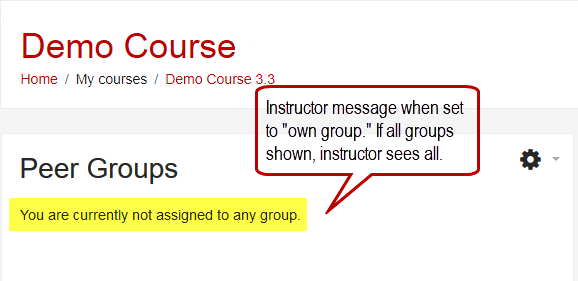
If you work with groups in Moodle, you're probably aware that you don't need to be enrolled in a group in order to track your students' activity within their group. Because as a teacher you aren't formally enrolled in any groups, when you post a Group Members resource set for "Own group," you'll see the message shown below when you open the link. Never fear, students are seeing their groups! If a Group Members page is set to "All groups," you will see all of the students listed just as they do.
Faculty can see who is in which group by clicking on the Participants link in the navigation drawer on the left, opening the gear to select Groups and selecting the Overview tab.
Group Members: Set Up Display
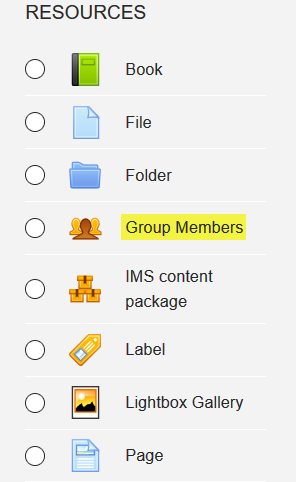 To create a Group Members link, with editing turn on, click on Add an activity or resource and scroll down to Group Members in the RESOURCES area. Name the link (Team Members, Groups, Peer Groups, etc.). Add a description if you like.
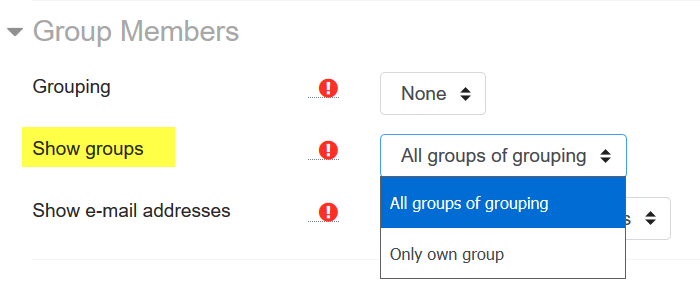
The only setting you need to address is whether you want students (and yourself) to see the membership of all groups or just their own group. In the Group Members option area, choose All groups of grouping in Show groups to display the names of all of the group members in all of the groups. Choose Only own group to allow students to see only the other members of groups in which they are enrolled. Save changes.
Update Due Dates
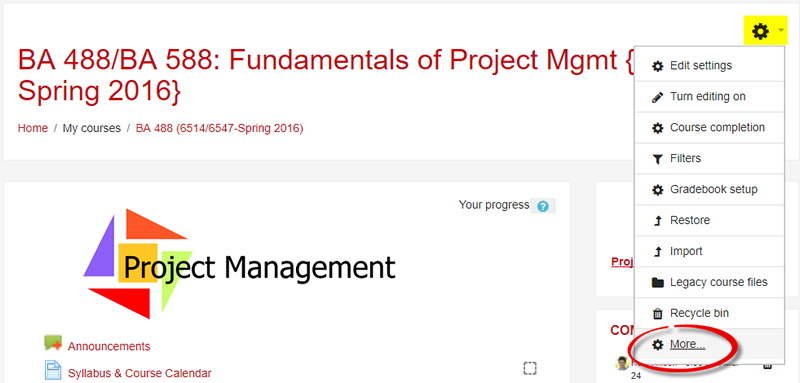
If you import content from a prior term into a new course shell, you know how much work is involved in editing all of the assignments and quizzes to reflect the new term's due dates. We now have a special "report" that allows us to update all of the dates in a course in one pass!
First, open the administration gear link and click on More...
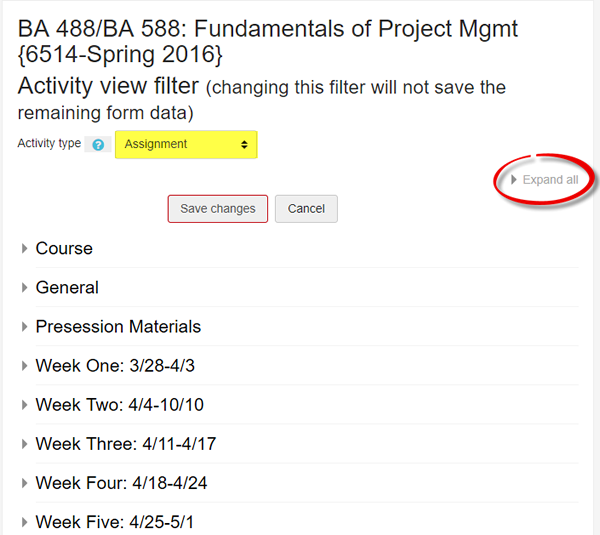
Due Dates: Getting Started
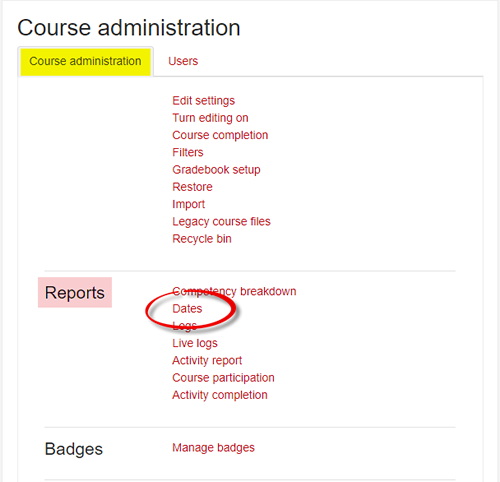
In the Reports area, select Dates.
Due Dates: Assignments
From the Activity type pull-down menu, select Assignment and click on Expand all.
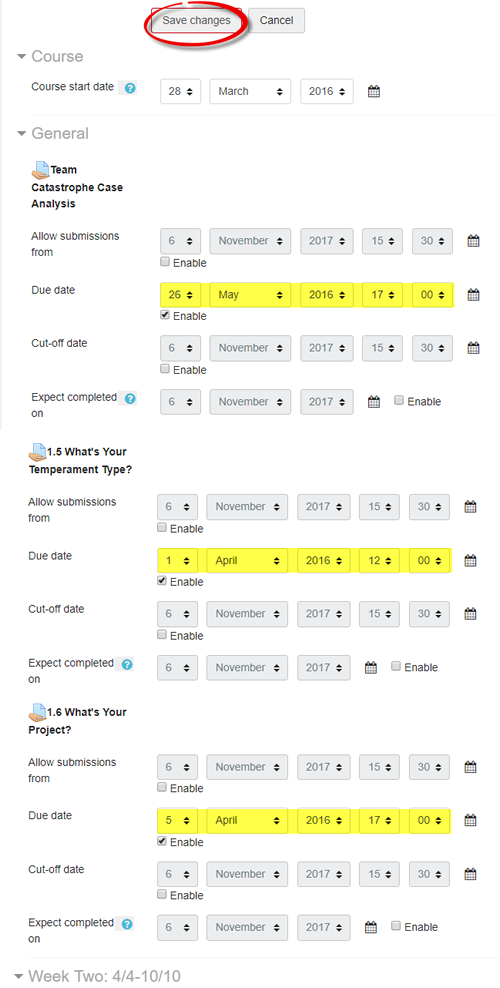
Due Dates: Update
After selecting the Assignment activity type, all of your course assignments will be listed down the page. Update the due dates as needed, then click on Save changes.
Note: Keep in mind that you don't have to have a date set to begin allowing submissions—as long as the assignment is visible to students, they can submit their work. Similarly, you don't need to indicate a cutoff date or an expected completion date for any assignment.
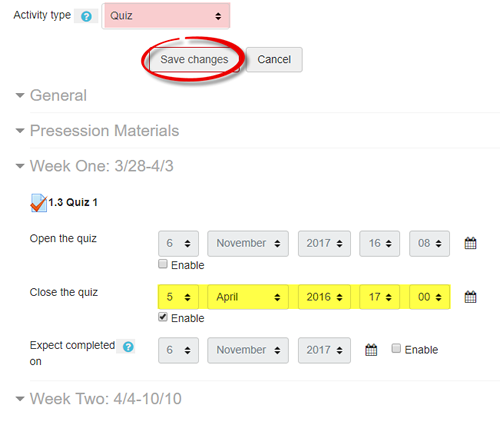
Due Dates: Quizzes
Quizzes are another area where we can update course due dates. Select Quiz from the pull-down menu and update the open and close dates as needed. Save changes.
Scheduler
One of the new apps that we've added is a "Scheduler." A scheduler activity allows you to established time slots for your students to meet with you—office hours, oral exams, even class presentations can be scheduled using this tool.
You can set up graded slots and assign points to an appointment. A feedback box is provided for the student as well as a confidential note-taking area for the instructor.
Reminders can be auto-scheduled to be sent to students prior to the appointment.
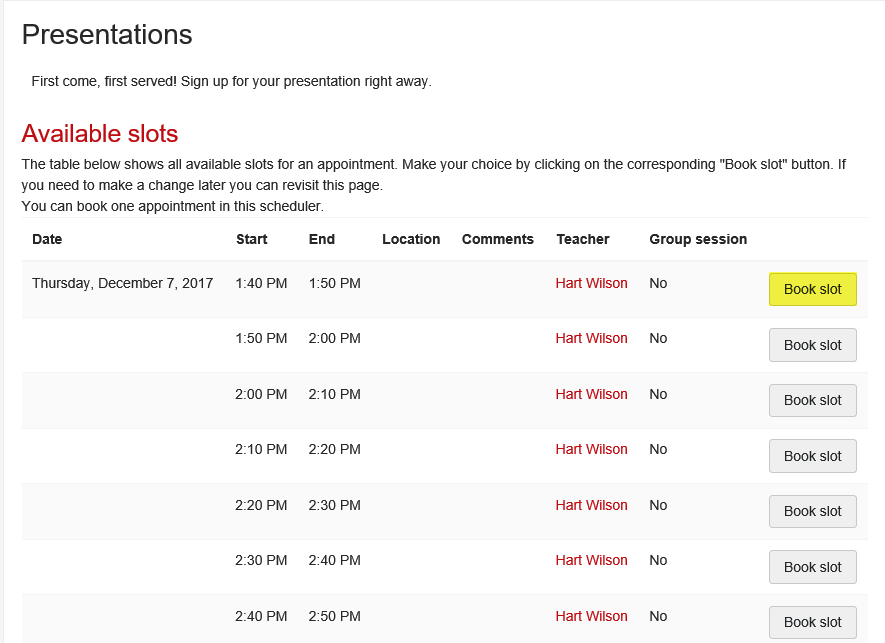
The Scheduler activity below is designed for students to sign up for class presentations.
Scheduler: Student View
Here's what the options look like for students—they click on Book slot in order to claim an appointment (or in this case, the time they want to present):
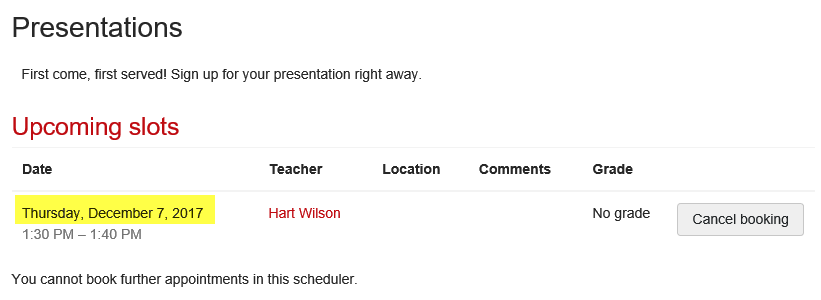
Appointment Confirmation: Student View
Once a student has booked a slot, this is what they see when they open the scheduler:
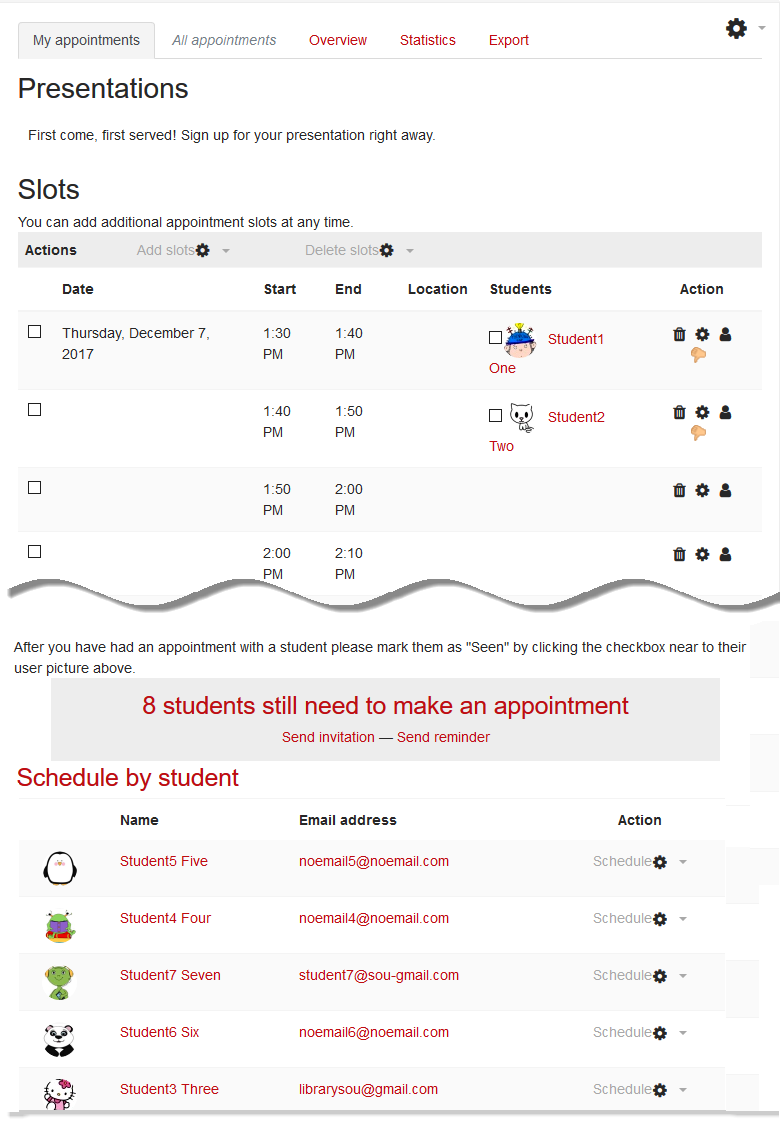
Scheduler: Faculty View
Once students begin booking slots, you can review their choices and see which students have not yet booked a slot. Note that you can email students who have not yet signed up (nagging made easy!).
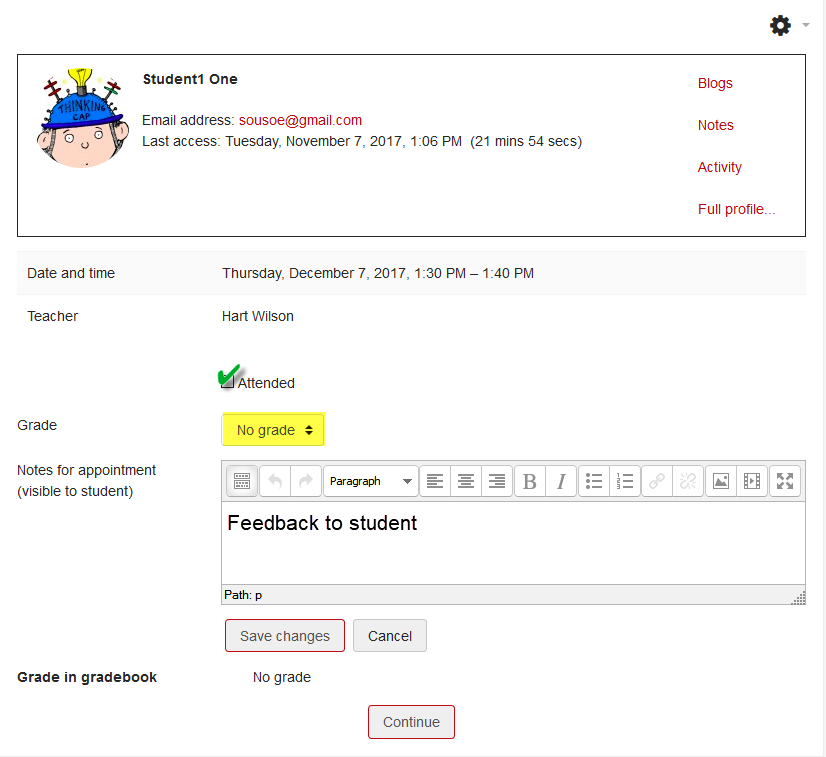
Appointment Information: Faculty View
Opening the appointment slot allows you to enter a grade (if you've set the session up to be graded) and provide feedback to the student. You can also include a confidential feedback box for your own notes.
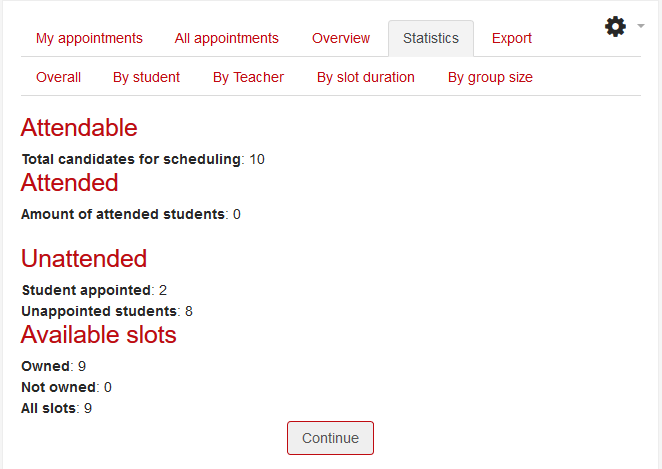
Scheduler: Session Statistics
The Scheduler is clearly very robust—here's an example of the stats you can review at a glance: